
Discovering Computers, Introductory: Your Interactive Guide to the Digital World 1st Edition by Misty Vermaat
Edition 1ISBN: 978-1133593461Discovering Computers, Introductory: Your Interactive Guide to the Digital World 1st Edition by Misty Vermaat
Edition 1ISBN: 978-1133593461 Exercise 18
Connect the Physical Devices Once you have assembled your equipment, you can connect the devices in the network. Usually, the modem will be connected to the source of the Internet transmission (DSL, cable, or satellite). Then the modem is connected to the wireless router, which in turn is connected to the computers on your network. After these connections are completed, each of the computers that will be used in the network that do not have a built-in wireless network adapter must have the adapter attached, often by using a USB connection. Once these connections are made, the computers can join the network. Follow the remaining instructions in the wizard to finish creating the network configuration. Once the network is created, follow the network adapter's instructions to join the network. When Windows prompts you to select a location for the network, select Home network. If you do not select Home network, you will be unable to complete the steps in the next section. If the computer you are connecting is in a public place and you are concerned about its security, you either should select Work network or Public network and not complete the following steps.
Create the Homegroup To establish a homegroup and share files with other computers on your network, complete the following steps:
1. Click the Start button on the Windows taskbar and then click Control Panel on the Start menu.
2. Click the 'Choose homegroup and sharing options' link below the Network and Internet heading to display the HomeGroup dialog box.
3. Click the 'Create a homegroup' button to display the Create a Homegroup dialog box.
4. In the Create a Homegroup dialog box, place a check mark next to each item you wish to share with other computers connected to the same homegroup and then click the Next button.
5. Once Windows sets up the homegroup, it will display a password that other computer users will need to know to join your homegroup.
6. Click the 'Print password and instructions' link to open the 'View and print your homegroup password' window, which contains your homegroup password and instructions about how other computers on your network can join your homegroup (Figure).
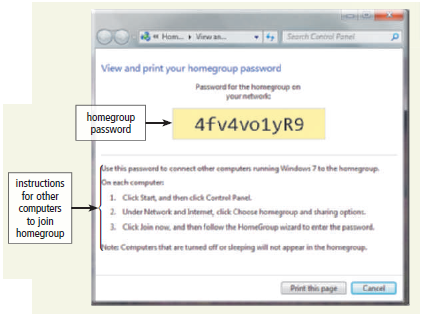
7. Ready the printer according to the printer instructions and then click the 'Print this page' button to display the Print dialog box. Select the printer to which you want to print and then click the Print button to print these instructions.
8. Click the Close button on the title bar to close the 'View and print your homegroup password' window.
9. Click the Finish button to open the HomeGroup window (Figure).
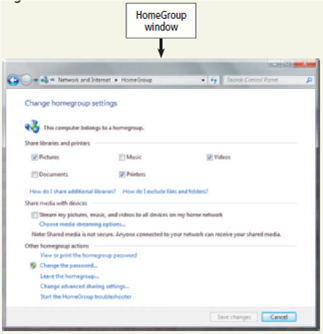
10. If necessary, make changes to your homegroup settings and then click the Save changes button. If you have no changes, click the Close button on the title bar to close the HomeGroup window.
11. Follow the instructions you printed in Step 7 to join other computers to the homegroup.
Exercise
1. Form a three-person team whose responsibility is to create a Wi-Fi network for a small business in your local area. Assign tasks to each member of the team. Write a detailed plan for creating the Wi-Fi network, including the brand and type of equipment to be purchased, costs, and a schedule for completing the work. Explain why your team made each choice, and be prepared to defend your choices. Submit the plan to your instructor.
Create the Homegroup To establish a homegroup and share files with other computers on your network, complete the following steps:
1. Click the Start button on the Windows taskbar and then click Control Panel on the Start menu.
2. Click the 'Choose homegroup and sharing options' link below the Network and Internet heading to display the HomeGroup dialog box.
3. Click the 'Create a homegroup' button to display the Create a Homegroup dialog box.
4. In the Create a Homegroup dialog box, place a check mark next to each item you wish to share with other computers connected to the same homegroup and then click the Next button.
5. Once Windows sets up the homegroup, it will display a password that other computer users will need to know to join your homegroup.
6. Click the 'Print password and instructions' link to open the 'View and print your homegroup password' window, which contains your homegroup password and instructions about how other computers on your network can join your homegroup (Figure).
7. Ready the printer according to the printer instructions and then click the 'Print this page' button to display the Print dialog box. Select the printer to which you want to print and then click the Print button to print these instructions.
8. Click the Close button on the title bar to close the 'View and print your homegroup password' window.
9. Click the Finish button to open the HomeGroup window (Figure).
10. If necessary, make changes to your homegroup settings and then click the Save changes button. If you have no changes, click the Close button on the title bar to close the HomeGroup window.
11. Follow the instructions you printed in Step 7 to join other computers to the homegroup.
Exercise
1. Form a three-person team whose responsibility is to create a Wi-Fi network for a small business in your local area. Assign tasks to each member of the team. Write a detailed plan for creating the Wi-Fi network, including the brand and type of equipment to be purchased, costs, and a schedule for completing the work. Explain why your team made each choice, and be prepared to defend your choices. Submit the plan to your instructor.
Explanation Verified
Plan for creating a Wi-Fi network
The p...
Discovering Computers, Introductory: Your Interactive Guide to the Digital World 1st Edition by Misty Vermaat
Why don’t you like this exercise?
Other Minimum 8 character and maximum 255 character
Character 255


